
How to Choose Pendant Lighting: Size, Shade and Placement
In brief
Choose pendant lighting around the surface you use: match the arrangement and size to the space, then choose a shade that gives you the light and seated view you want. Use total installed drop to check the hanging position, and confirm the light source and controls before ordering.

Key takeaways
- Start with the job: working light, evening atmosphere, or both.
- Choose the arrangement and shade size together; use total installed drop to check the hanging position.
- Compare shade openings from your seat, lumens for output and Kelvin for light color.
- Repeat a room feature, then confirm the exact fixture, light source and compatible controls.
Start with where—and how—you will use it
Choose a pendant for the surface and activity you want to light. A downward light can serve a counter or reading spot; a shade that glows into the room can add atmosphere. Pendant lights hang on a cord, chain or stem, bringing light and a focal point closer to the place you use.
| Where it will hang | Start with | Easy to overlook |
|---|---|---|
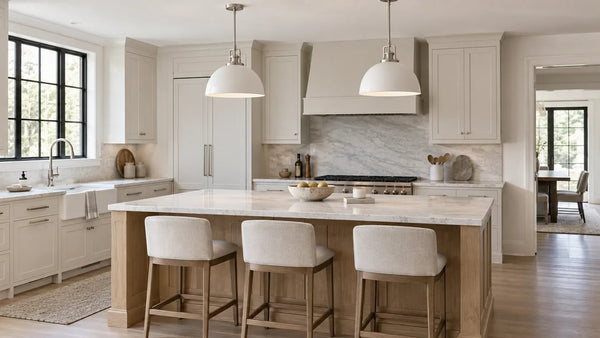
| Kitchen island or counter | Light reaching the working surface and a layout that fits the usable length. | The view across the counter, shade openings and existing ceiling connections. |
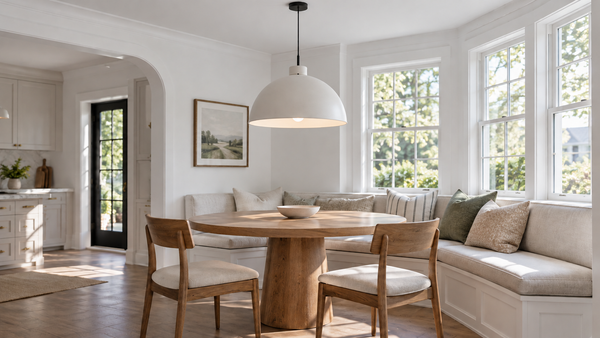
| Dining or breakfast table | A shape that suits the table and light that feels comfortable while seated. | The table’s extended size and whether you can see the bulb from your chair. |
| Beside a bed | Light reaching the book or bedside surface where you need it. | Your view from the pillow, the shade beside your head and reachable controls. |
For a pendant that serves both working light and evening atmosphere, compare its light direction and dimming options alongside the other lights in the room.
For a table, compare the silhouette and your seated view while browsing dining room pendants. Beside a bed, prioritize the reading position and reachable controls when comparing bedside pendants.
Choose the size, number and hanging position
Choose the arrangement and shade size together, then check how low the complete fixture will hang. This helps you balance the surface below with the view across the room.
Decide how the lights will be arranged
Choose one focal point or a repeated row, then compare the ceiling arrangement. These options give you different ways to organize the light:
- Single pendant: a useful starting point when you want one focal point over a table or bedside surface. Compare the sizes and outlines in our single pendant lights collection with the space below.
- Shared-canopy fixture: several hanging lights organized by one ceiling plate. Compare a long plate for a row or a round plate for a cluster; the selected fixture sets their available positions.
- Separate pendants: a repeated layout with individually positioned fixtures. Plan each ceiling mounting point around your chosen shade widths and gaps.
Use the canopy drawing—the drawing of the ceiling plate—to plan mounting positions with your installer.

Compare the ceiling plates as well as the shades.
Choose the number and size together. Two broad shades can occupy as much visual space as three smaller ones. Sketch the actual shade widths above your surface, including the spaces between their edges. For worked layouts and hanging-height checks, use our Kitchen Island Lighting Guide.
Measure the whole fixture
Total installed drop tells you where the bottom of the pendant will sit. Measure from the ceiling mounting surface to the fixture’s lowest point, including its body and suspension. Record the widest shade or fixture width and body height as well.
A full-size outline helps you choose between two sizes before ordering. Compare width for a round table, and both length and width for a long table:
- Measure your surface. Note the edges and the seats or routes around it.
- Make two outlines. Use paper or cardboard at the actual widths of your shortlisted pendants. For an elongated fixture, include its full length too.
- Check the view. With a helper, view each outline at the proposed hanging position from the seats and doorway. Compare its scale, the space around the edges and any interrupted sightlines.
This mock-up checks proportions; light coverage also depends on the fixture’s output and direction. For worked width comparisons and adjustment-range checks, use our pendant light size guide.

For a low ceiling, start with the shortest permitted total installed drop. Over a walking route, measure clearance from the floor rather than from a countertop.
Choose the shade and light effect
Choose the shade for both where the light goes and what you see from your seat. Transparency, openings and the bulb’s position shape that experience.
Clear glass and exposed bulbs
Clear glass makes the bulb and its reflections part of the look. It can keep the fixture visually light. Compare lit views from the side and below, and check access to both sides of the glass for cleaning.
Diffusing shades
Opal glass or a diffuser softens the appearance of the light source. For a seated view, look at the underside as well as the sides: an open bottom may still reveal the bulb.
Opaque shades and their openings
An opaque shade directs light through its openings. A downward opening can concentrate light toward a surface. Compare the actual underside: a deep dome can hide a bulb from some side views while leaving it visible from directly below.

Use these close-ups to compare transparency, side-wall diffusion and the lower opening. Different illustrative designs are shown at similar viewing sizes.
Browse glass pendant lights to compare shade shapes and the visibility of the light source in individual product photographs.
For working light, compare the opening aimed at your surface. For atmosphere, consider the light reaching the surrounding room.
Compare brightness and light color separately
Lumens help you compare light output. Watts describe energy use. Check whether the published lumens describe a bulb or the complete fixture, then consider its direction and diffuser. The FTC’s bulb-shopping guide explains brightness and warm-to-cool light appearance.
Kelvin (K) helps you compare how warm or cool the light looks. Lower values look warmer; higher values look cooler. Match the specified K value of nearby lights if you want a coordinated starting point. If you want a change, compare a warmer option with a more neutral-white option in the same setting. A sample helps you judge the appearance alongside your furniture and finishes.

Illustrative light-color comparison; not a calibrated color-temperature or brightness test.
Match the pendant to your room
Repeat one room feature to make the pendant feel connected to the space. A curve, straight line, finish or texture gives you a useful starting point without needing a decorating-style label.
- Follow the furniture’s lines. A rounded shade can echo a round breakfast table; an elongated fixture can follow a long table. Compare that familiar relationship with a contrasting shape and keep the one you prefer in your room.
- Control visual weight. A broad opaque dome makes a strong silhouette. Transparent glass lets more of the background remain visible, while woven or fabric shades add texture. Beside busy cabinets or patterned curtains, start with a simpler silhouette; in a quiet room, try a bolder shade as the focal point.
- Repeat a finish selectively. Echo a handle, faucet or nearby light, or let one contrasting finish become the accent. You do not need every metal surface to match.
- Keep the surrounding view in mind. In an open-plan room, look toward nearby dining lights and windows. Repeating a simple shade may feel calmer beside a detailed chandelier or patterned backsplash.
Once you have two looks you like, use a room view to judge their presence and isolated product views to compare their canopy, cord color and shade shape.
Check these details before ordering
Confirm the complete fixture and compatible controls before ordering. Use this checklist for the exact option you have chosen:
| Check | What to confirm |
|---|---|
| Complete installation size | Overall width, body height, canopy size and minimum/maximum total installed drop. |
| Ceiling and mounting | Connection locations, mounting support and suitability for your ceiling, including a slope if relevant. |
| What arrives | A complete fixture or shade only; number of heads, included bulbs and required mounting parts. |
| Light source and upkeep | Replaceable bulb type, or integrated LED service/replacement options; access for cleaning. |
| Controls | Whether dimming is supported and which specific wall control, remote or driver is compatible. |
| Electrical and location suitability | Documented compatibility with your US installation and any location rating required for the intended space. |
For replaceable bulbs, check size as well as the socket type. A bulb that fits the socket may still project below the shade. For controls, look for the exact compatible dimmer or remote system; hanging-height adjustment and light-color selection describe separate features.
Use your shortlist and measurements to resolve any remaining mounting questions with your installer.
FAQs
Is a multi-light pendant the same as several separate pendants?
A shared-canopy fixture groups its lights onto one ceiling plate; separate pendants use individual mounting positions. If you are replacing existing lights, compare those positions with the new fixture’s drawing before choosing the layout.
Does a glass pendant always give more useful light?
Choose glass for the appearance you enjoy, then compare output and direction for the surface you want to light. Clear glass reveals the source; diffusing glass softens its appearance. Neither description tells you the useful light reaching the surface on its own.
Can I use a pendant with a low ceiling?
Start with its documented minimum total installed drop and the clearance needed at that position. Check the required rod or mounting parts too. If the fixture cannot sit high enough, compare a shallower design or a ceiling-mounted alternative.
Can pendant lights provide all the lighting a room needs?
Sometimes, but this depends on the room, output, light direction and the tasks you need to see. A pendant that lights the table well may leave the rest of the room dim. Plan it alongside existing ceiling, wall or task lights where needed.
Should I choose replaceable bulbs or integrated LEDs?
Choose replaceable bulbs if you want to change bulbs independently, within the fixture’s specifications. For integrated LEDs, check the available light color, compatible controls and service options before buying. Base the choice on the design you want and how you prefer to maintain it.
Sources
- Lowe’s: Pendant Lighting Buying Guide — reference for shade openings and the distinction between task and ambient lighting.
- Lightopia: Pendant Lighting Guide — reference for proportion, sightlines and checking scale with a mock-up.
- FTC: Shopping for Light Bulbs — comparing lumens, energy use and light appearance.
- US Department of Energy: Consumer Guide to Energy-Efficient Lighting — understanding warm and cool light in Kelvin.
Comments
Have a question or a useful tip? Leave a comment below.